Monday, July 30, 2012

Prepping fever...

Prepping began about 10 days ago on four new projects. Three commissions and one sales item.

One in progress commission is one of my all time favorite mules....a Mulinette mule sculpted by the super talent of Brigitte Eberl....


Next is the without-a-doubt famous Stormwatch resin sculpted by the ever popular Sarah Minkiewicz-Breunig...this one is a commissioned item....


...and I am sure everyone is familiar with this next project...the larger-than-life Independence resin sculpted by the talented Sarah Rose of Rose Horse Studios....he is a commissioned item...


Next is the super tough draft ...he is the Romulus 2 resin sculpted by the talents of Mandi Hickman....another commissioned item...


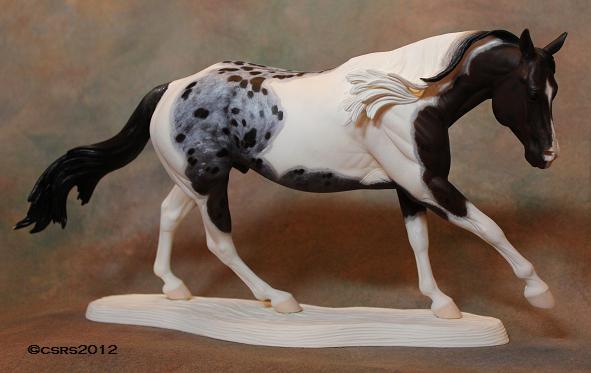
Last but not least is my next sales item...this is the well known Rose Reining horse...another wonderful sculpture by the gifted Sarah Rose of Rose Horse Studios. This copy I plan to customize by the addition of the copper support bar to the bottom of his rear hoof so that he stands on his own without a base. As you can see in the photo below the addition of the bar has almost been completed.....I also want to customize the base so that the new owner can use the base with the resin for display or use the resin in a performance set up or show the resin at a live model horse show without the base if they wish.

I have high hopes of making my idea work...we shall see....


I wanted to pass along a new item idea I've been using for a few months...it is the steel reinforced Epoxy J.B.Weld. My husband introduced this to me one day when he was fixing something. I've used it several times in mending different things around the house...the name plate on the mail box and other stuff....and I've also used the J.B.Weld to fix resin horses that have been sent to me for repairs of ears, legs and tails. It can be sanded just like the Aves brand but it is more liquid so it can not be sculpted until it is dry....and I doubt if you could use it to sculpt an ear tip as it has just too much of a liquidity to it. Using it to mend two broken parts together it works fantastically well! Much better than Super Glue as it does not deteriorate over time.

This is the same product I used in a previous post about the mending of the ceramic frog...also I use a piece of the blue painters masking tape to hold the two broken pieces together while the J.B.Weld is drying.


That's about it for now..more soon!
Enjoy your day everyone!
C.S.Richmond Studios


Thursday, July 26, 2012

"Air Diva" & Rose Reining Pintaloosa commission completed...

All done with the Rose "Affinity" project and one more commission...I added real metal shoes to the "Affinity"..."Affinity" is the project which I've titled "Air Diva"

For those who are interested in the "Air Diva" auction click "here"

I decided to offer the auction as a web page auction for many reasons ... top reasons mostly pertaining to business.

I have also completed a pintaloosa Rose Reining horse commission....the Reining horse is sculpted by the super talent of Sarah Rose.

Here is the Reining horse....


...and here are a few of the photos of "Air Diva"...


...and with shoes below...


Nearing completion are an Eberl Mulinette mule resin, an Eberl Violetta resin, and an Annihilator V1 resin.

Have a wonderful day everyone!
C.S.Richmond Studios


Sunday, July 22, 2012

Rose Affinity "Air Diva" project..

"Air Diva" is almost ready to cross the finish line....a few more finishing touches and she will be completed.

I love the sculpted details in this resin...the eyes and the face...the mouth slightly open gives me the opportunity to paint a hint of pink there hiding in the dark black/brown of the horses mouth.

Here are a few preliminary photos I took this afternoon...the rest of the photos will have to wait for Monday morning.


This item is an auction item to be auctioned off soon via my website. Here is the link:


More information and photos of "Air Diva" soon!
C.S.Richmond Studios

Thursday, July 19, 2012

The unusual grey colors....

I love the colors of grey that are "off the beaten path"..the warm grey tones I love the best....the nice different color of the mane and tail on these two look wonderful to me.

I've been working on two projects here in the studio that are very similar in color and tone...both are about 50% completed.

The Annihilator V1 resin is a commission and the Rose Affinity resin is an up and coming sales or auction  item. I've titled the Rose Affinity project "Air Deva"....

I can say that I can visualize several sculptures in this color... I'll be using this color on several future sales items...


Have a wonderful day everyone!
C.S.Richmond Studios


Wednesday, July 11, 2012

The new Bacchus resin and commission progress....

You all may have seen the new wonderful Bacchus resin ....Bacchus is sculpted by the talented Emilia Kurila...here is the page of Bacchus photos:

http://destriermodels.webs.com/bacchus.html

Bacchus was released in a small pre-sales number of 20 copies...as of this mornings post there are 2 copies left available for order.

Emilia will be offering Bacchus again soon in a larger lot for purchase....payment in full and there will also be time payments available.

I'll be painting  two of these wonderful sculptures that will be sales items...I'll be painting one for myself to keep in my private collection...and I'll also be painting two as 2013 commissions.

As a side note..if you haven't signed up for my C.S.Richmond Studios sales/auction and commission newsletter please do so. The newsletter contains only information on my sales and auction offerings and commission offerings when they come available.....the newsletter is delivered right to your email inbox too! No need to search my web page or other model horse sales areas for information on what is for sale or at auction...or if I'm booking commissions.


Here is the link if you would like to sign up:
http://webs.us5.list-manage1.com/subscribe?u=9179e7ff932a6fdb379cb3bdc&id=03e67cd9fe

My newsletter has taken the place of my Yahoo group for announcements on sales, auctions, and commissions. I am enjoying this new tool so much...the newsletter is much more professional looking and I can add photos to my newsletter too! No need to insert links to other photos pages and such as I needed to do with the Yahoo mailings... and the newsletter has, so far, had 100% success in delivery. 


Commissions:


Above are, starting at top left: Rose Reining horse resin, Annihilator resin, Mulinette resin, and a Violetta resin.


Lovely Violetta will be a chestnut appaloosa. Violette is sculpted by the talents of Brigitte Eberl.


Annihilator, sculpted by the talented Debbi Lermond, will be painted a very attitude-suitable deep dark dappled grey...in my minds eye I can see that this color will be so stunning on him once completed...


Lovely Mulinette, with her sweet face will be a dark sabino color...Mulinette is sculpted by the super talents of Brigitte Eberl.


And last but surely not least is the Rose Reining Horse sculpted by the ever gifted Sarah Rose...he is, as you can see, a pintaloosa color. Since this photo was taken I've adjusted his facial markings a tad...

More soon! Have a wonderful day everyone!
C.S.Richmond Studios

Monday, July 9, 2012

Sticky oily seepage part 2...

Thanks to everyone who responded to my last blog post about my sticky oily resin event...I was surprised to learn about how many other artists have come across resins that had this issue....thank you all so much for the helpful info!


Here are some of the wonderful information that was sent to me:

Joanie Berkwitz 
Yes, this was a problem 'way back when'. Incompletely mixed resin, where the body and the catalyst hasn't completely fused. My guess it that it is catalyst that is leaking through minute veins of unconsolidated material. (it lies like a thin vein or ribbon running through the cured resin)


The yellowing is probably from the resin being exposed to UV light. It's an aging issue, not a smoking issue. I have resins in the workshop (reference material) that have never been near nicotine. Just like plastics and PVCs will degrade and become brittle from exposure to UV light, so will resins, particularly the older ones.


 I poured resins, once upon a time. Pour Horse started out in the resin business. Hated the stuff and developed allergies to it. But the old resin didn't mix as completely. You would end up with, like I said, little fine ribbons of the catalyst (which is thinner and more liquid) running through the resin body. (body, in this case, meaning the actual bulk material that had to have the catalyst to cure) These little streamers of catalyst would remain oily, once the rest of the resin 'kicked off'. There is nothing left for the catalyst to react to. Remember, resin curing is a chemical bonding cure. A reaction cure. As opposed to drying, or being heated, or whatever


 In the curing process (which takes only minutes, once the mix is started, up to maybe half an hour typically) heat is created. The heat is the energy being released by the chemical bonding action. The heat varies by type of resin... and also the brittleness or lack of brittleness is a property of the varying heat releases. The newer resins mix better, don't know what they did, but like Betty Crocker puts things into cake mix to make it mix easier, the resin companies must have done something similar. You don't come across that any more. No fix as far as I know, because nothing is going to draw that oily stuff out except capillary action over time. Even a strong primer can only hold it in, not cure it. Eventually it will work its way underneath and flake paint off.


The bottom line is that I never heard of one of these sticky guys being fixed fully, but it was fairly rare to find, and also that the yellowing (and stickiness) didn't have anything to do with smoking. Nicotine can definitely hurt resins and plastics, but not in this way.... 


 A sprue is actually an outlet for air, it's not usually the term used for the pour hole. A sprue might go from the ear tips, tail tip, etc to the outside of the mold so that when you pour the resin in, the air can escape out and let that part fill all the way. I've always said 'pour hole', though resin casters might have a different term. In ceramic, there is also a 'spare' which is an additional piece that fits over the pour hole to make it longer, but resin casters don't use that.


Sprue holes would be much smaller, they are more like little tubes. I have used things like coffee stirrers imbedded in the claying up of the mold to create sprues, also heavy gauge wire. They only need to be big enough to let the air out, but they don't need to be too big or otherwise the resin will come out and leak all over everything. There is a book on the ancient bronze horses of San Marco that talks about their sprues. A very old technique! Bronze is even more viscous than resin, so a bronze casting would have a lot more sprues so that the air can escape and let the bronze in quickly. Otherwise, legs and stuff are like a straw that you put your finger on the end of, and put it in your soda... the straw won't fill with soda until you take your finger off. Same principle. In ceramic, however, the air can go between the edges of the plaster mold (which are never a perfect fit) and also into the pores of the plaster, so ceramic molds don't need sprues.


Sheila Bishop
Joanie is right. It's sometimes caused too if the resin is old or it's being used in a hot area, it kicks too fast and causes the same problem. Also some of the resins can be cooled to make them kick slower but it can also keep them from chemically bonding. Some are very sensitive to cool temps. Normally if it's leaching all over it's a done deal.


Sheila Bishop :
They do sometimes leak from the spru. It's not common if it's all over the horse so it's not a good sign when it's doing this. There are many things that can make it happen. Not drilling a vent hole after casting, resin not mixed well, being exposed to heat (most common cause of oil leaching, especially in older resin), not enough or too much mold release, stripping will do it (resin is very chemical sensitive) and so on.


Try to drill a decent size hole in the resin around the worst area. If there is uncured resin still inside, it can cause that oily stuff to surface. Make sure you clean out any resin goo you find (if any). If that doesn't work drill a few small holes in the oily areas. Let the horse sit in a hot area (not direct sun but outside where it's hot). It will help bring out any oil. Leave it a few days, bring it in, clean it with alcohol and do it again, until it stops. If you get it to stop give it a dry baking soda bath, then clean with comet and hot water. Let it sit in a warm area again. If still clean then fill all but one vent hole and primer. If you use Painter's Touch primer (at Home Depot) it helps since it's made to stick to plastic. Good luck.


Wonderful information ladies thank you so very much!!!


In my case with this resin is that the oily stickies are in many places.....I am very glad that the customer and I decided to alleviate all possible causes by removing all paint, primer, and fillers and starting over from scratch and starting off with using a different primer for the second go round. I am very thankful that the resin had not been shipped to the customer and then developed its issues....

The newer made resins that are shipped to me are light in weight and the surface is very smooth. Some have the texture and feel of fine white marble. I have one older resin here that, before I had her prepped, reminded me of very dark matte antique glass...a fantastic blackish-green volcanic matte glass look and wonderful feel.


I hope my posting my resin event...and the info I received from Joanie and Sheila will be helpful to those who also may have this issue arise. 


Have a wonderful day everyone!
C.S.Richmond Studios


Thursday, July 5, 2012

A case of sticky oily seepage...

I thought I would post this issue I had with a resin for the learning purpose for other artists. In this post the resin is an older cast.

I had long read about resins, mostly the older cast resins, becoming sticky and seeping an oily residue onto the surface of the resin...sometimes many years later after they had been cast.

This poor resin, who the customer and I gave every chance to stop his issue, is the first I've encountered with the sticky leaking problem.

There were no signs of issues with the resin whatsoever when he arrived here in the studio....only being very yellowed which I considered what would happen if the resin perhaps was housed in a home where people smoked.

I began my usual prepping routine and completed the prepping over a period of about 6 weeks. I then painted the resin using my usual painting procedure, let him dry, and then applied the sealer...my same routine sealant.

Then the problems began...he became sticky in several areas and I notified the customer and that there were several things I thought might be the problem. The resin itself, my canned primer being a bad batch, my canned sealant being a bad batch, perhaps prior paintwork had been removed using a paint thinner which may be reacting to my primer and oil paints.

We agreed to leave the resin sit for a few months to see if the issue would cure. Sadly it did not....the paint was puckering and lifting from the sticky areas...

After much thought I suggested to the customer that I remove the paint, sealer, primer, and any filling material that was there...watch the resin for a while to see if the issue re-appeared, and if there were no issues, I would then re-paint the item.

It was a very sad moment when I had to remove my paintwork from this poor fellow...almost like a funeral..silly I know...perhaps other artists who are reading this post will understand :)

After removing the paint and waiting the few months I saw no issues...so I went ahead and applied the primer..a different primer.....the Bulls Eye primer that I hand mix and apply with an air brush or apply by hand.

 I applied two thin coats and then put the resin on my studio shelf to watch for about 30 days.

Yesterday I checked the resin only to find the same issue had re-appeared...the resin was sticky in the exact same areas as he had been before....the oily areas show up well on the surface of the matte primer....


When touched the areas feel like old cooking oil that has sat for a very long time after being used...the oil will lift off at the touch of a finger but the area that your finger touches is sticky or tacky...the resin material is still hard..not soft.

Hopefully this post will help those artists should you encounter an issue similar to this....I would love to hear any similar stories you all may have...
Have a wonderful day everyone!
C.S.Richmond Studios


Monday, July 2, 2012

Rose "Affinity" ..colors...

I love this sculpture. She is the wonderful new "Affinity" TB filly sculpted by the ever popular Sarah Rose.

I've chosen a title for this project...she will be titled "Air Deva".

I've also chosen a reference color photo to use as a template...I can see a hint of wonderful tones in the reference horses coat...warm brown floating around in there with all those wonderful dark gray tones.

The reference photo was taken by Cindy Evans of Cindy Evans Photography. I've admired Cindy's photography for a while now and she just happened to have this photo among the many wonderful horses in her albums. Photo credit goes to Cindy Evans...thank you Cindy!

I'll be adjusting the dark hair color spot on the reference horses face...something a bit more subtle...but I love the white face marking on this horse...the way it curls over the horses nostril...


"Air Deva" will be my next sales/auction item....she will be painted in wonderful oil colors....ahhh the warm rosey grey colors!

Have a wonderful day everyone!
C.S.Richmond Studios


Sunday, July 1, 2012

"Affinity" next sales/auction item....


"Affinity"
sculpted by Sarah Rose

I love this sculpture...so much expression in her face even unpainted. "Affinity" has been sculpted by the ever gifted Sarah Rose.

"Affinity" will be my next sales/auction item. She will be hand painted in oil colors to a nice dark warm-colored dappled grey with lots of color variations in her coat, some small facial markings, and three white sox. I have a reference photo on hand that is my #1 pick for her colors.

Commission photos coming soon...making good progress on several items.

Have a wonderful day everyone!
C.S.Richmond Studios