Thursday, December 27, 2012

Studio progress & wishing everyone a very happy New Year!

I hope everyone had a wonderful Merry Christmas filled with wonderful family and friends!

2012 flew by so quickly and here we are looking at the end of 2012 ...and a bright new beginning with the incoming 2013 year! Wishing you all a very Happy New Year!

As always I greatly appreciate each and every one of you for your continued interest in my paintwork! From the bottom of my heart I thank you!

Work continues here in the studio at a good pace...many projects are at the 50% completed stage...some are sales items and some are commissions.

The two commissioned projects here in the studio that are in the 98% paintwork completion stage are the wonderful Elsie and Oliver resins. Elsie and Oliver were both sculpted by the super talents of Sarah Minkiewicz-Breunig. Elsie stands approx 6 inches tall and Oliver stands approx 4 3/4 inches tall.

Both are being hand painted in oil colors by me, Sandra Hottinger of C.S.Richmond Studios.


Happy New Year!
Sandra Hottinger
C.S.Richmond Studios


Friday, December 7, 2012

It's the most wonderful time of the year!

It is the most wonderful time of the year!

Family visits and dinner get togethers...cold air and snow in the air! Bright shining colors and lights everywhere decorate peoples homes for the Christmas Holiday Season..inviting colorful light displays.

Wishing you my very best for a joyful Chirstmas Season!

I had not realized that it had been 30 days since I posted a studio blog post...I've been very busy and time got away from me!


Above are pictured the next batch of items on the painting table...since this photo was taken several of these fantastic sculptures have had two or three coats of paint applied. I have also prepped a wonderful Emilia Kurila "Bacchus" resin ...he is ready for paint. Also a commissioned Carol Williams Valor resin is 95% prepped.

I also completed a commissioned Storm Watch resin...wonderfully sculpted by the super gifted Sarah Minkiewicz-Breunig.


My goal and plan for 2013 is to paint several sales items. The items are the resins I spoke of earlier this year...the many wonderful resins that I have purchased over the years. It is time to get these guys painted while my eyesight is still good enough to paint fine details.. 

My plans are to keep several in my personal collection and to place the balance in sales folders on my web page or on another photo web sight..a photo web page that does not have all of those goofy pop-ups.....perhaps linking my web page sales to the photo page. My web page allows small photos..not large enough for my liking to show the fine details ...I would love to hear suggestions of photo web pages from you all!

Commission books for 2013 have been kept to a minimum...one commission per month. Cancellations of orders and completions of commissions will open up a painting slot. 

For those of you not familiar with my commission/sales newsletter...for my studio commissions and sales notices only...here is the form:


That's about it for now! 
Wishing you all a very Merry Christmas!
Sandra Hottinger
C.S.Richmond Studios


Friday, November 2, 2012

Prepping in the sunshine.....

First I would like to send out many thoughts and prayers to those who were in the path of the super storm hurricane Sandy.

Here are the snow/wind/rain totals from NOAA for those who are interested..34 inches of snow in Gatlinburg Tenn and 90 MPH winds in Tomkinsville NJ & Islip NY....

Also:

Per Science News: "Hurricane Sandy has the lowest central pressure ever recorded north of Cape Hatteras, N.C. As of 11 a.m. Eastern time on Monday, Sandy had a minimum central pressure of 943 millibars, breaking the record of 946 millibars from the 1938 “Long Island Express” hurricane."


The amazing power of wind and water!

Yesterday I applied the primer to several prepared resins....I know I've written posts about this before but this time I wanted to included a few more photos to the subject.

About 4 to 6 months ago I began using a new primer. I'm using the Zinsser Bulls Eye Water Based Primer and Sealer....this primer is white, mixes with and cleans up with water, and is sand-able.

I buy the quart can and apply my primer with my super cheap-o air brush.

Here are my supplies I use:


1)Small air compressor
2)latex glove to use on the hand holding the resin I am spraying
3)dust mask....since I am spraying outside and down wind this is the mask I use.If you are spraying sealer or primer in an enclosed area you would need the mask that is used for blocking vapors and dust.  
4) cheap air brush
5)air brush bottle
6)spoon or knife to spoon the primer from the can to your bottle and also to stir you water and primer mix
7) water container and water

First I fill my air brush bottle about 1/2 full...


The Bulls Eye is pretty thick so I need to water it down to about 50% primer and 50% water in order for the air brush to be able to spray the primer onto my subject. I also want to apply several thin coats of primer rather than thick coats....drying good between coats as well....

Next I mix my 50% water and 50% primer that is in my air brush bottle...the mixture should be about the thickness of skim milk or low fat milk....


You can see above that the thickness is about like low fat milk....

Next I test the mixture and spray with my air brush to be sure the mixture is thin enough and that my air brush is working properly before I spray my subject...


You can see above that the coverage of the mixture is pretty good. I will need to apply about three coats of primer for that day....I apply one coat and let the sprayed items dry in the sun ( I am working today in 65 degree temps) and go back about an hour later and apply the second coat....wait an hour and then I apply the final coat. 

When I finish one of the coat applications I remove my air brush and air brush bottle top from my air brush.bottle ....all in one piece ....and place into my measuring cup of water. This keeps the primer from drying on my equipment while the primer layers are drying on my subjects.

I hold my subject about 12 inches away from my air brush while I am spraying...turning the subject while I spray and spraying in small sweeping motions. Applying the primer this way keeps from applying too much primer in one area and having drips on the subject....


After I've finished my primer session I clean my air brush by running some water through the air brush...I do this by placing my brush and the cap into a small container of water and depressing the button to release air through the device....


Next I allow the primered items to dry for a few days and then go over them under my studio light for places that need to have the primer re-applied and/or sanded. At that point I can apply any other primer I need to apply ( 50/50 water/primer ratio) with a small make up sponge or super soft brush.

That is about it...


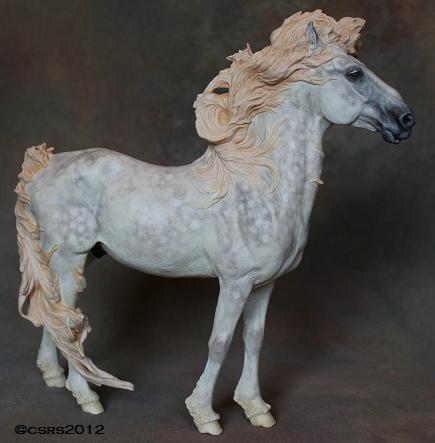
Here is a group of resins that are ready to paint...five of these were prepped by others ..Terri Grothpietz and Charlotte Donahue worked their magic for providing me a wonderful smooth "canvas" to paint on....I can not remember who pepped the "Say Hello" resin.....

Among the group is a customized Ravenhill Revisited which is copy #9 out of the first 20 pre sales for Ravenhill Revisited sold...a customized Rose Reining horse..a wonderful AA Donna Chaney Clydesdale removed from its base...and a lovely Spago resin customized by the talents of Dagmar Anderson.

Have a wonderful day everyone!
Sandra Hottinger
C.S.Richmond Studios


Wednesday, October 10, 2012

Slow paint drying weather....

The cooler temperatures are here early this year...temperatures well below the normal...loving the nice fall weather!

Paint drying time has slowed with the cooler temperatures as it does every year....mostly effecting the drying times of the whites.

I have been prepping several resins preparing for the next group of projects. Elsie & Oliver, Valor, Bacchus (2 copies), a customized Ravenhill Revisited, and the customized Rose Reining Horse are all part of the next batch of projects.

Below you see the continuation of  the Stormwatch resin...he now is much darker and has dapples and fleabites. Stormy is drying now for about a week before I can proceed with the next painting session...his last coat of paint contained an extensive use of white shades of color.


Another interesting project is the Ravenhill Revisited project....RR is sculpted by the super gifted team of Hillary Hurley and Stacy Tumlinson.

Here I have customized this copy with a new shorter mane and tail to match his soon to be spotted colors....


Happy fall everyone!
Sandra Hottinger
C.S.Richmond Studios


Tuesday, October 2, 2012

Feeling "soul comfort" with a new technique...

In my last studio blog post I wrote of my experimentation with the use of colored pencils for detail work. When I started painting the Independence resin commission I had in my mind that I wanted the throw something new into my technique. I had purchased two sets of colored pencils about 5 years ago and used them once or twice....giving up when the pencils would not leave any color on my painting surface. At the time I was using a slightly glossy sealer to seal my oil paintwork before moving to the next step of the application of the colored pencils....thus the sealer surface was the reason for the colored pencils not working well.

The two sets I purchased were the Prismacolor Premier Portrait Set  and the Derwent Graphtint Set of 24. 

With the Indy project I began with an oil color base coat and applied the acrylic and colored pencil detailing directly over the well dried oil colors. I can say without a doubt that this is my "soul comfort" zone of technique...you artists know the feeling ...when you have stumbled upon a new technique that you want to take to a higher level ...to take and improve upon....and that you REALLY REALLY like the look of the end result. 

I am also using the chestnut and warm grey colored pencils for adding flea bites to the Stormy commission project....I want to work in some of the white pencil later on for white detailing and highlights...curious to see what the look will be using the white.

Stormy is sculpted by the super popular Sarah Minkiewicz-Breunig.


Here below you can see the Derwent white, warm grey, and chestnut pencils that I used on the Indy and that I am using on the Stormwatch resin...


And here are a few photos of the completed Independence resin...Indy is sculpted by the super gifted Sarah Rose...Indy sports the colors of silver bay pintaloosa or Walkaloosa...


Have a wonderful day everyone!
Sandra Hottinger
C.S.Richmond Studios


Wednesday, September 26, 2012

Colored pencils....

This week I experimented with the use of some colored pencils on the "Independence Project". I love the bit of extra zip that the colored pencils have added to the fine hair detailing....


...and loving the colors in his mane and tail....


Have a wonderful day everyone!
Sandra Hottinger
C.S.Richmond Studios


Monday, September 17, 2012

Decisions on colors...

For a long while now I've been having difficulty making color choices for the resins I purchase... and have purchased in the past....that I will paint to be sales items. I've been doing commission paintwork for many years now which is painting the customers choice of color...no decision work on my part for color choice not having to choose colors to paint has rendered me "out of color choice practice" so to speak...

Yesterday I realized the factor that was making my color choice for sales items so difficult...it was the idea that I need to paint the most marketable color for sales. I would choose a color for a sales item and start to second guess my color choice as a color that would not sell.

We all know what a gamble these days a sales item can be with the economy being what it is ..we are seeing this from day to day in everything from homes for sale down to the most minute sales item that remains unsold on a store shelf.....this "sales" factor issue was making my choosing the color of my sales items a "HUGE" challenge. Over-thinking a color choice and flip-flopping between colors for me makes weeks go by with no progress on the sales item....

Sooooo...light bulb! Yesterday I realized that I need to be painting for "me"....a color I love and a color that inspires me as I used to do back when I first began painting the equine sculptures....I have realized that I need to paint sales items as if I am painting the item for myself to keep...after all I will have the item here in my personal collection to enjoy until it sells.

So I am thinking I need to forget that there are herds of the same breed color/ pattern on a specific resin out there....I had a customer write to me a few weeks ago about a color they wanted painted on a resin...they already own several of the same color on the same resin that they wanted me to paint...they wrote that they like to see the difference in each artists interpretation of the color in the painting medium and technique that they are using...and that all of the items look different although they are painted the same color...very good point....

My favorite colors to paint in order of favorites are appaloosas/pintaloosas, the dilute colors...the silver bays and other silvers fascinate me..maximum expressed sabinos..and the rose shades of grey and the fleabitten greys! Bay roans are also an inspiring color for me...next are the super dark chestnuts and bays...

Commission progress:
Indy has all of the first coat of details applied...moving on to the next several layers....he will be a silver bay pintaloosa....


Emilia Kurila "Bacchus"... trio seen here in studio...two are commissions and one is my copy...one commission will be silver dappled....


Only three of the 24 "goal to finish by the end of 2012" commissions remain to be prepped and painted.....I am betting that these three will run into completion for the month of February 2013. These last three are to be highly detailed with several hand painted fine hair detailing layers... the Valor sabino and the Fraley Iko and Tee Nah spotted appaloosa  ...among my favorite colors to paint and resin favorites too!

Have a wonderful week everyone!
Sandra Hottinger
C.S.Richmond Studios


Tuesday, September 4, 2012

The leaves of summer....

The leaves of summer green are beginning to change to their fall colors ....the reds are showing on some of the shrubs...a tad early I think.

Fall my favorite time of year!

Progress continues in the studio with the prepping and painting of several commissions and the one Rose Reiner sales item.

Silver dilution coat colors....along with the color dappled grey the silvers are my favorite all time horse colors.

Here is a traditional sized Independence resin I am painting as silver Walkaloosa ...Indy is a commission project. He will have a light silver mane and tail once completed.  In this photo Indy is about 35% completed.


The progress on the Rose Reiner sales item is good...I've customized his mane to be tack friendly for a saddle breast collar and reins.....I'm still thinking how to incorporate the base along with this customized Reiner....I've also removed Reiner from his base and I've made him "free standing".

Both the Rose Reiner and the Rose Independence resin were sculpted by the ever popular Sarah Rose. 


...last but certainly not least is the wonderful Stormwatch commission....Stormwatch is an amazingly detailed sculpture created by the super gifted Sarah Minkiewicz-Breunig.

This copy of Stormwatch is being painted as an elder slightly dappled flea bitten grey...he will have a golden toned mane and tail once completed as well as individually hand painted flea bites. Stormwatch is about 35% completed in these photos....


Have a wonderful day everyone!
C.S.Richmond Studios

Saturday, August 25, 2012

Sealer discussion..."Annihilator" shows the difference...

Several people have asked me what sealer I use. I completed the Annihilator V1 project yesterday so I thought this would be a good time to show the difference sealer makes to my paintwork.

I have mentioned this several times before and I'll mention it again for those who so not know...it is very important not to breath any spray sealant, spray paints, ect. as they can cause all kinds of respiratory issues. Always spray outside and apply your sealer so that the wind is blowing the spray away from you. There is a saying I read once: "If you can smell it you are breathing in the fine particles of the spray".

I am painting in oil colors and I use the Krylon Artists acrylic brands of sealers. I started out in 2003 using the Krylon Matte seen here:

http://www.krylon.com/products/matte_finish/

This sealer will cause a milky-cloudy look to darker painted horses, such as bays and blacks. if used on a humid day or if you apply the sealer too thickly in one spraying session. It will also cause a fine powdery look to dark horses if applied too far away from the surface of your item.

Later I moved on to other textures of sealants ..mostly because I was looking for a sealant that would bring out the fine color quality of the oil colors I use better than the matte sealer.

I moved onto using these two sealants for my work: The Krylon Workable Fixatif

http://www.krylon.com/products/workable_fixatif/

and the Krylon Satin Finish:

http://www.krylon.com/products/satin_finish/

You will notice that all of the above are non-yellowing sealants...using a sealant that does not yellow is, without doubt, very important to preserving the quality of your work. You would not want your white markings or your white horse to become yellow several years down the road.

The Krylon Workable Fixatif is wonderful if you want a more glossy look or a slightly glossy look. Apply the sealant in two or three coats for a more glossy look. For a less glossy look apply the sealer from about 14 inches away from your item and only apply two thin layers.

I like the Krylon Satin to apply to my white or lighter colored horses. Also some customers do not care for the slight gloss look of the fixatif ...it is then that I use the Satin finish.

I have never had an issue with these sealers becoming sticky on the surface of my completed paintwork. The key is to allow your paint work to dry COMPLETELY before applying any sealer. It is also key to allow your primer to dry completely before applying another coat of primer or applying your paint layers. It is also very important to allow your paint to dry very well between layers before applying the next coat of paint.

Now for the photos...on Annihilator V1 I have used the workable fixatif.
Annihilator V1 was sculpted by the super talented Debbi Lermond.

Before sealer:

after sealer


before sealer


I have read that the sprays have a shelf life. I have used cans of the sealer up to about 2 years after purchase.  

For glossing hooves and eyes I hand paint a high gloss sealer with a tiny brush. I use the "Deco Art Triple Thick" acrylic and the Delta Ceramcoat gloss acrylic sealer. Both of these clean up with water and are non-toxic.

Well....that is about it for the information on the sealers I use.

Have a wonderful day everyone!
C.S.Richmond Studios


Wednesday, August 22, 2012

"Violetta" completed..and a few works in progress....

Wonderful "Violetta" is completed. "Violetta" is the amazing sculpting handy work of the very talented Brigitte Eberl. "Violetta" is a commissioned item....


Another amazing sculpture I am currently painting is the "Romulus 2"..."Romulus" is sculpted by the talented Mandi Hickman. Here "Romulus" is a work in progress and he is a commissioned item...


...and last but certainly not least is the hulk of anger "Annihilator V1" resin sculpted by the very talented Debbi Lermond...in the photos "Annihilator V1" is 99% completed....I still need to apply his sealer ...the sealer will bring out all the wonderful colors and tones of the oils....."Annihilator V1" is a commissioned item...


Next up are the fantastic Independence resin and the Stormwatch resin both as commissions. Indy will be painted to a highly detailed walkaloosa and Stormy will be an aged flea bitten grey.

Have a wonderful day everyone!
C.S.Richmond Studios